We have a couple of Ninja Turtle fans at our house. And not all of them are children.
So, when we were trying to come up with what to do for the youngest’s third birthday, the teenage turtles were an obvious choice. Not because the birthday boy necessarily likes them a lot, but because everyone thought it sounded like fun.
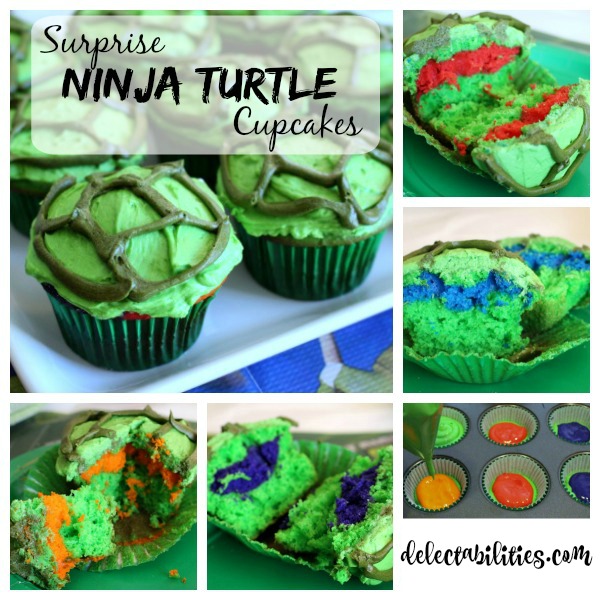
These Surprise Ninja Turtle cupcakes were actually the first idea that we had for the party and they too were a family collaboration. We wanted to make them fun so my husband had the idea to have the hidden strip of color in the cupcakes. My daughter came up with the idea to make the cupcakes look like turtle shells. I’ve sure got a fun family. They turned out so cute and each of the kids at the party had such a fun time taking their first bite to find out which turtle they got.
So, now for the quiz. Do you know which color goes with which turtle? Do you even know all the names of the turtles? Let me tell you that I do, but it is recent knowledge. I grew up with two awesome brothers and I was a bit of a tomboy, so I at least knew all of the turtles names. But I was not interested enough to know which color went with which name. Except Michelangelo. He’s the fun orange one. That one is easy. The others, I had no clue, and to be honest didn’t really care.
Until my husband informed me how vital this information is. So I have learned and will never forget. Just for your information, Raphael is red , Leonardo is blue, and Donatello is purple.
Now that you have some vitally important and completely useless information, let’s make some surprise ninja turtle cupcakes!

Use just a very little bit of green at the bottom, just to give a base. I ended up with about 4 of each of the 4 colors.

Use a ziplock bag to fill in with the green batter. Make sure to cover the color, but not to fill the tins more than 2/3 full or they’ll overflow when baking.
Ingredients
- 1 white cake mix
- 2 eggs
- 1 cup plain yogurt or sour cream
- 1/2 cup milk
- 1/3 cup vegetable oil
- food coloring, several drops each: green, red, blue, orange, purple
- 3/4 cup butter, softened
- 3 cups powdered sugar
- 3 tablespoons heavy cream
- 1 1/2 teaspoons vanilla
- pinch of salt
- green food coloring
Instructions
- Heat oven according to cake mix package instructions. Prepare 2 muffin tins with cupcake liners (I used green ones).
- Mix all cake ingredients together until combined, then beat on high for 2 minutes.
- In 4 small bowls, measure out 1/2 cup of batter into each of the bowls.
- Of the small bowls of batter, color 1 of them with red, 1 with orange, 1 with blue and 1 with purple. You want the colors to be pretty vibrant so you can tell the colors apart.
- The remaining batter should be colored green.
- I found it easiest to place the green batter in a big ziplock bag and snip one corner to control and distribute the batter.
- In the prepared cupcake liners, layer just a scant amount of green batter (about a tablespoon) just to cover the bottom.
- Then add about a tablespoon of one of the other colors to each of the cups.
- Then use green to cover the color and fill to about 2/3 full total.
- Bake according to instructions, then pull out and allow to cool on cooling rack before frosting.
- Beat butter in stand mixer or with handheld mixer for about 1 minute, until creamy.
- Add powdered sugar and mix for 1-2 minutes, scraping down the sides as needed.
- Pour in heavy cream and vanilla, and mix on high for 3-4 minutes or until fluffy. Add salt if needed, and add more cream, a teaspoon at a time if frosting is too thick.
- Add green food coloring and mix until you reach desired color.
- When cupcakes are cool, frost with the green frosting.
- If desired, use any leftover frosting to make a darker green by adding a bit of red and some more green to pipe on a simple shell design to each of the cupcakes.
Another Recipe We Think You’ll Love…


Cannot wait to start baking — some more. Finally, I’ve some new and fun things.